Oreo Drip Cake!

*This post may contain affiliate links. Please see my disclosure for more details!*
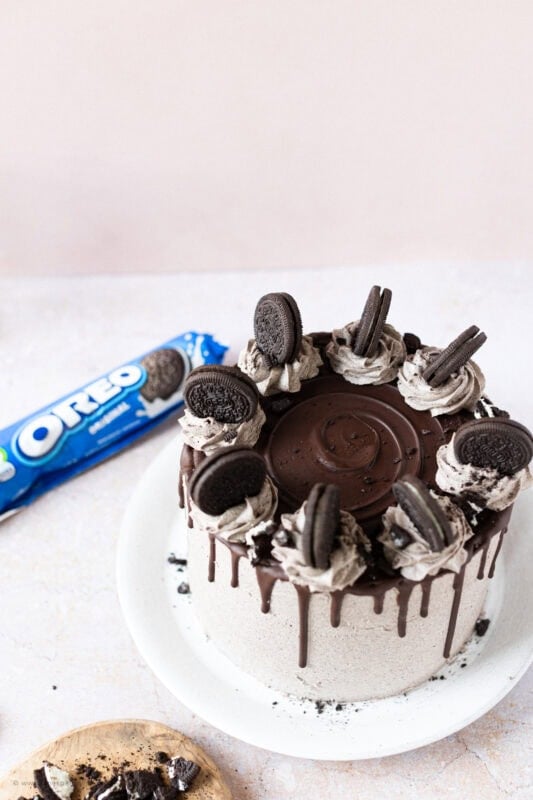
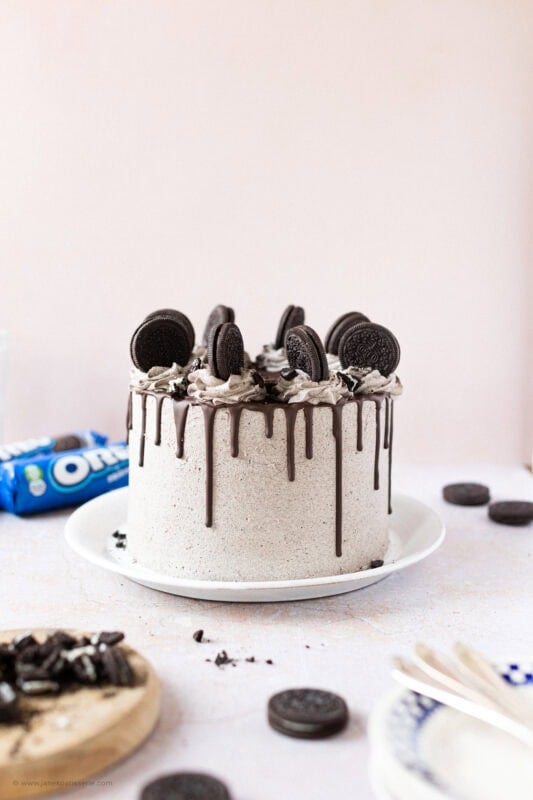
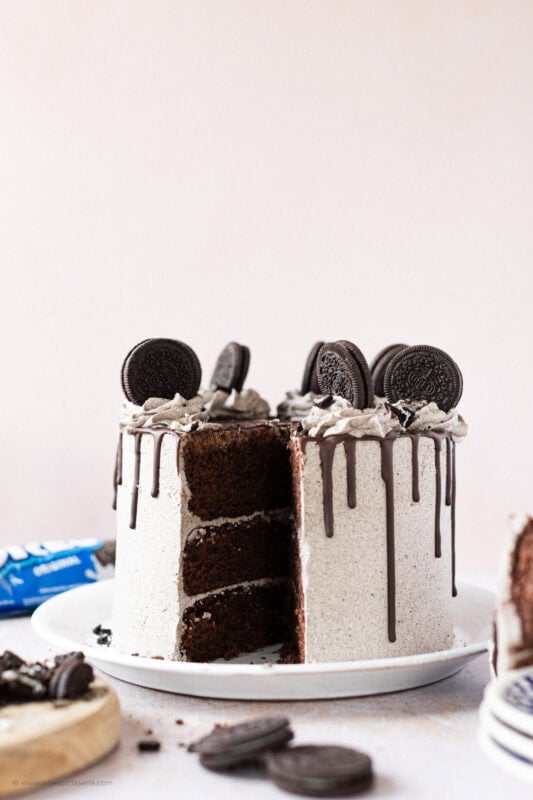
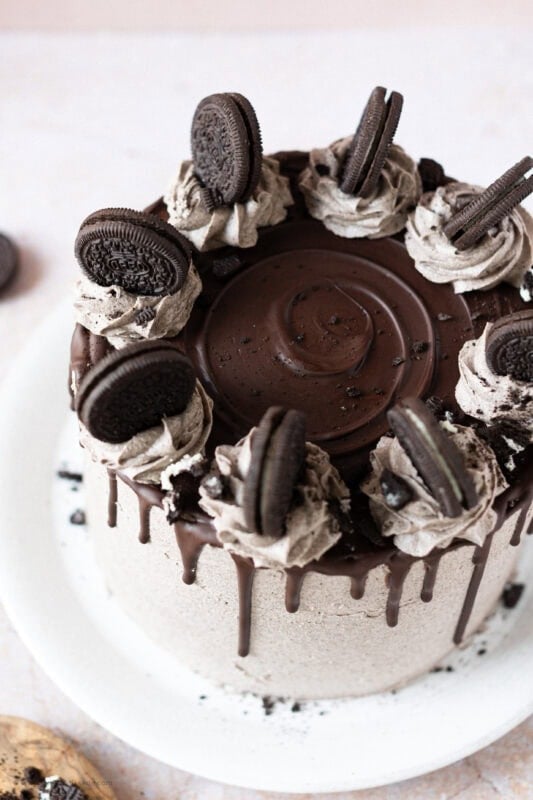
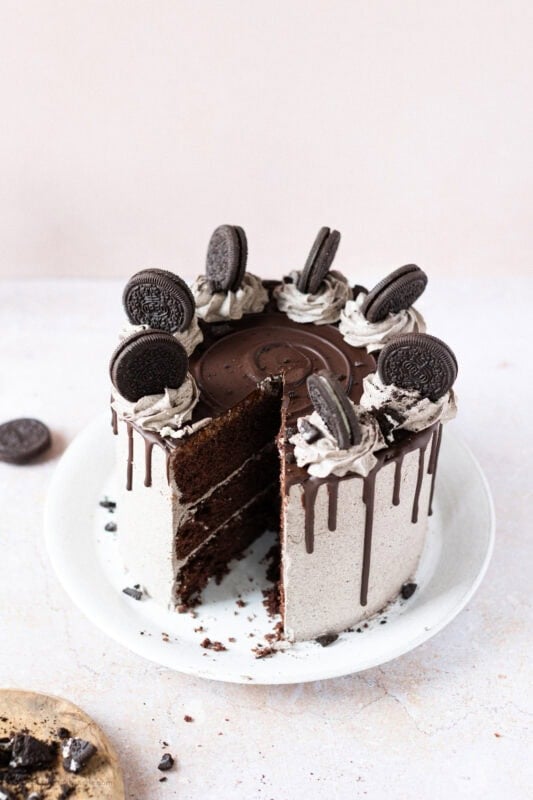
A 3-layer chocolate cake, with Oreo buttercream, a chocolate drip, and even more Oreos make a delectable & showstopping Oreo drip cake!
Oreo favourites
One of my dad’s colleagues recently had their last day at work, and because she has been one of my most enthusiastic taste testers (and just the loveliest person ever), I wanted to bake something properly special. Naturally… that meant a drip cake. You know I can never resist making a big showstopper, especially for an occasion.
And even though I didn’t actually get a slice of the finished cake (tragic, I know), I did “accidentally” taste-test several spoonfuls of the buttercream during decorating. Purely for quality control, obviously. The reviews from the office were glowing… apparently it disappeared within minutes!
I’ve been itching to make another Oreo bake for a while, and turning it into a full drip cake felt perfect. The Oreo buttercream alone is enough to convert anyone.
The sponge
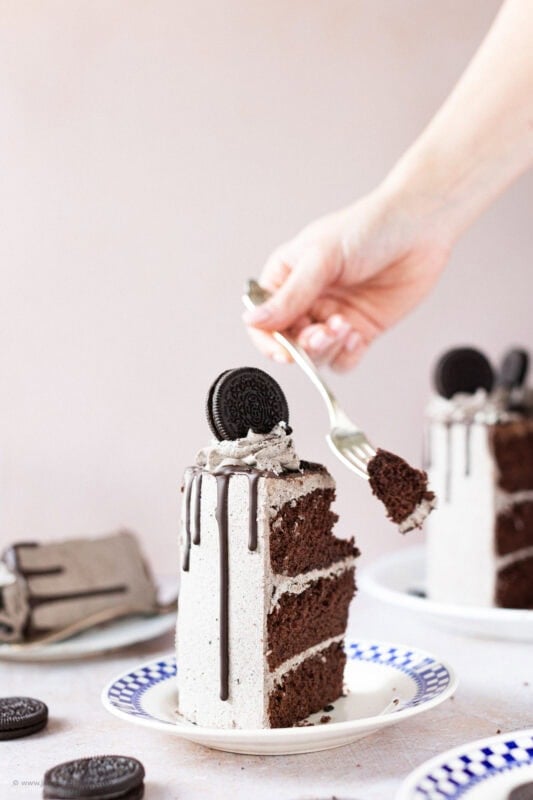
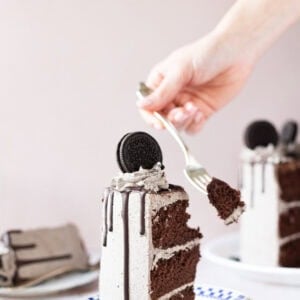
I used the same idea for the cake from my Salted Caramel Drip Cake and my Biscoff Drip Cake, just using less self-raising flour, and adding in some cocoa powder to make it chocolatey and rich. The layers bake up soft, moist and sturdy enough to build a tall cake without collapsing, exactly what you want for a drip cake.
- Butter – unsalted butter or baking spread at room temperature is the best way to go for the perfect fluffy sponge
- Sugar – for most of my sponge recipes I use light brown sugar but you can use caster, golden caster or dark brown sugar
- Eggs – 8x medium eggs roughly translate as 400g of egg weight, most of my recipes run on medium eggs unless specially stated otherwise
- Flour – self-raising flour will provide the rise needed for three beautiful tiers of delicious sponge
- Cocoa powder – I replace 75g of flour with cocoa powder to give that rich delicious chocolate flavour throughout the sponge as well as the buttercream frosting
- Baking powder – an optional extra to provide a lighter texture to the sponge, many have said they don’t like adding the extra as it is already in the flour, I will leave that choice to you.
- Milk – If you’re mixture is slightly thicker than desired you can use whole milk to gradually loosen the mixture, use one tbsp at a time!
I know three-layer cakes often look a bit intimidating, but they truly aren’t any more difficult than two layers. They just LOOK ten times more impressive, the wow factor alone makes all the effort worth it and the taste matches the presentation perfectly.
Oreo buttercream
For the frosting, I stuck with the same Oreo buttercream recipe I use for my Oreo cupcakes because it’s simply perfect, fluffy, sweet, creamy, and packed with Oreo biscuit flavour. I used 300g of butter and 650g of icing sugar, then blitzed an entire pack of Oreos into a fine crumb and mixed them in. It makes enough to fill the layers, coat the outside, pipe on top, and still have a little leftover to sneak spoonfuls of.
The texture is dreamy. There’s something about adding the crushed biscuits that makes it so easy to smooth around the cake, I honestly don’t know why, but I’m not questioning it. This will boost the presentation of your cake from standard to spectacular, a smooth coating of Oreo buttercream really will look like an expensive showstopper by the time you’re finished.
The drip
I tried a new method of doing the drip on this cake, by using oil. I’ve seen people having a few problems making the ganache drip as ganache can be quite temperamental, so after reading up on the oil method I had to try it.
You only use between 1-2tbsp of oil for this amount of chocolatey, and you can’t detect it once its added. It just makes the chocolate runnier, and easier to use, whilst keep its shine. You can just use melted chocolate, but often this can be harder to use as its thicker, and it well set very solid. I’m surprised I didn’t eat some of it myself, but I resisted to make sure it look better.
If you wanted to use a ganache however you can, simply use 150g of dark chocolate and 150g of double cream! (Read about the ganache drip here… Caramac Cake)
Decoration
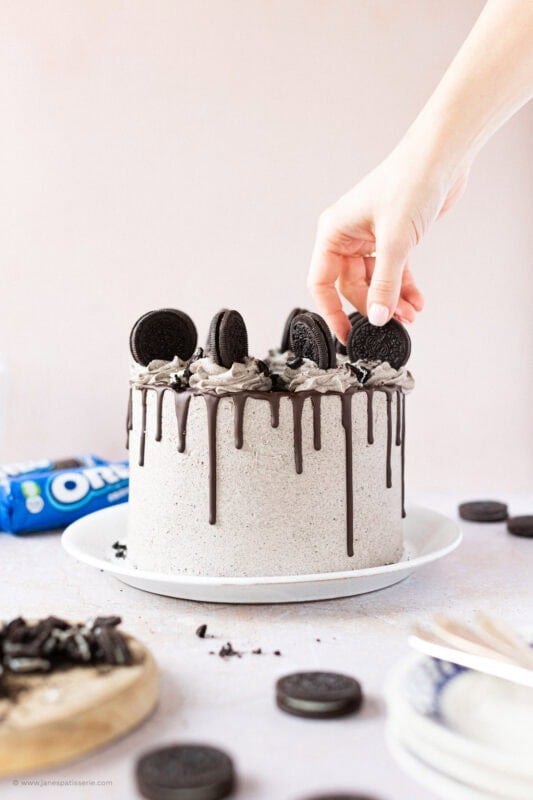
Once the drip had set slightly, I piped little swirls of Oreo buttercream around the top and added whole Oreos for decoration. A sprinkle of crushed Oreos finishes it off, because when you think you’ve added enough Oreos… always add a few more.
This cake is bold, chocolatey, and cookies-and-cream heaven. It’s fun to make, fun to decorate, and an absolute delight to present. I adored every minute of making this one, and the finished result brought so many smiles. I hope you love it as much as my dad’s colleagues did!
Two tier versions
I get asked all the time on my blog and social media if this cake can be made smaller, perfect for a more intimate family celebration or birthday. The good news? Absolutely! With a few simple tweaks, you can create a slightly smaller Oreo cake that’s just as delicious and impressive.
For a smaller version, I recommend using two 8″cake tins. You can adjust the ingredients as follows:
- 300g butter
- 300g sugar
- 245g flour
- 55g cocoa powder
- 1.5 tsp baking powder
- 6 medium eggs
- 3 tbsp milk
Baking time may increase slightly, around 5–10 minutes longer, depending on your oven and tin. For the decoration, you can use roughly two-thirds of the original buttercream and toppings, which still makes for a gorgeous, indulgent cake.
This scaled-down version is perfect for smaller gatherings and still delivers all the Oreo, chocolate, and cookies-and-cream goodness of the full-sized drip cake. It’s a flexible recipe that adapts beautifully for any celebration
Tips & tricks
- You obviously don’t have to make straight edged buttercream if you don’t want to, but I just like the look of it. You can slather it on, and it’ll still taste damn delicious.
- However, if you do want to make it like this, I seriously recommend using a metal scraper for the decoration of the buttercream, and the disposable piping bags.. I wouldn’t be anywhere without them.
- All of the decorations are completely optional , but I love this style of cake.
- This cake will last in an airtight container for 3 days.
Oreo Drip Cake!
Ingredients
Cake Ingredients
- 400 g unsalted butter/baking spread
- 400 g light brown sugar
- 400 g eggs (roughly 8 medium)
- 325 g self raising flour
- 75 g cocoa powder
- 2 tsp baking powder
- 4 tbsp whole milk
Oreo Buttercream Frosting
- 300 g unsalted butter (room temp - not baking spread)
- 650 g icing sugar
- 154 g Oreos (1 pack)
- 2-5 tbsps whole milk
Decoration
- 175 g dark chocolate
- 1-2 tbsps vegetable/sunflower oil
- Oreos
- crushed Oreos
Instructions
For the Cake!
- Heat the oven to 180ºc/160ºc fan and line three 20cm/8inch cake tins with baking parchment – leave to the side.
- In a stand mixer, beat together the butter and light brown sugar until light and fluffy. Add in the flour, cocoa powder, beaten eggs, baking powder and beat again briefly till combined – try not to over beat the mixture! If its really thick, mix in the whole milk to loosen.
- Divide the mixture between the three tins and smooth it over – bake for 25-30 minutes until a skewer comes out clean when poked, and when the cake springs back.
- Once baked, leave the cake to cool in the tin for 10 minutes, and then remove and leave to cool fully on a wire rack. If the cake has domed slightly, leave the cake to cool upside down to flatten it slightly.
For the Decoration!
- In a stand mixer, beat the room temperature butter with an electric mixer until it is smooth and loose and then beat in the icing sugar 1/3 at a time until its fully combined. Keep beating the buttercream for a few minutes so it starts to get fluffier and lighter.
- In a food processor, blitz the packet of Oreo’s to a fine crumb, and add into the buttercream. Beat the buttercream again till smooth, and use the Milk to loosen it to a smooth consistency.
- Once the cakes are cooled, put the first layer on the serving plate spread some of the buttercream onto the top of the first layer, add the second cake on top, and then top again with some of buttercream and then add the final sponge layer. Only use about 2 tbsps of buttercream per layer so that you have enough to decorate with!
- With the leftover buttercream, as you can see, I covered the sides (and top) too! Do a first layer of around the edge and top using a large metal scraper and refrigerate for 10 minutes. Repeat again with a slightly thicker layer of buttercream.
- I slather it on all over using an off -set spatula, and then run the metal scraper round until its smooth. If the Oreo’s were blitzed to a really fine crumb like you need, the buttercream can still be smooth around the edges even though there is biscuit in the mix!
- Once finished, melt the dark chocolate in a heat proof bowl until melted. Add in 1tbsp of oil and beat till smooth, continue to add oil till you get to a drippy consistency. I used 1+1/2 tbsps total. Using disposable piping bags, pipe it round the edge of the cake, edging over slight bits to create the drip.
- You don’t need to use too much per drip as it’ll drop quite far down by itself! Fill in the top in with the rest of the chocolate so the top is also covered. Refrigerate the cake for about 15 minutes.
- Using some left over buttercream, pipe little rosettes of buttercream onto the top and add a whole oreo – sprinkle on some crushed oreos and huzzah! You’re done! Enjoy!
Notes
- You obviously don’t have to make straight edged buttercream if you don’t want to, but I just like the look of it! You can slather it on, and it’ll still taste damn delicious.
- However, if you do want to make it like this, I seriously recommend using a metal scraper for the decoration of the buttercream, and the disposable piping bags.. I wouldn’t be anywhere without them!
- All of the decorations are completely optional – but I love this style of cake! To make a smaller version of the cake, use:
- Two 8″cake tins
- 300g butter
- 300g sugar
- 245g flour
- 55g cocoa powder
- 1.5tsps baking powder
- 6 medium eggs
- 3 tbsps of milk
- And it might take an extra 5-10 minutes to bake and use 2/3 of the decoration recipes!
- This cake will last in an airtight container for 3 days!
Hey i am just wondering why this cake is set to 180 degrees in the oven and your victoria sponge is set for 170 degrees in the oven or should they both be 180? thank you for your recipes, forever loving this blog
It’s demonstrating time differences.
This cake looks amazing! I will be making this for my Dads birthday gathering!
Jane, quick question:
How comes the recipe does not require eggs – Is it because of the self-raising flour?
Thanks!
It does contain eggs…
Hi there! I’ve never fully covered a cake with buttercream like this before and I’m a bit nervous. Would you advise doing a crumb coat, and if so, what would be best to use? Any other tips would be really appreciated! 🙂 x
You can just use some of the Oreo buttercream for a thin buttercream crumb coat – I use a small angled spatula to go round it and smooth it with the scraper (same as when you are finally decorating it!)! x
Hi Jane – I’m half way through making this cake and It’s going great but have found the buttercream to be incredibly sweet ! Is there a way to make it less sweet or once I have put the cake together, will the sponge balance out the sweetness?
Many thanks !
Hey! It’s an american buttercream recipe so it will always be sweet – especially with the added Oreos. You could use salted butter I guess, but I’m not sure how this would taste!
Made this for my sons 5th birthday party. All the other mums were very impressed and asked if I took orders to make one for them!
Thank you for the great recipe.
Am I able to used caster sugar instead of light brown or would you advise against this
Thank you
Love your recipes x
Yes you can! x
Jane this looks amazing! I had a go at my first drip cake last week, it did not go well! I’d not heard of the oil method, so I’ll give it a go next time (any excuse to try more cake!).
The light brown sugar mentioned, is it light muscovado sugar or brown caster sugar?
It’s light brown soft sugar!
I was hoping to make an Easter cake , so could I replace the Oreos for mini eggs or would that not work ?
Have a look at my Easter Cakes for inspiration – I wouldn’t advise putting mini eggs into the buttercream when making a drip cake!
Hi, could I increase this recipe by 25% to make a 9” instead? How many large eggs 8?
Thanks
You need to increase by 1/3 to make it fit a 9″
Hi just a quick question can this be made into a tray bake? Love this cake I have made it a few times always goes down well.
I’m sure it can be! I haven’t personally however – but an Oreo traybake would be scrumptious.
I want to make this cake for my birthday next week, however I work full time so it’s hard to fit in baking and decorating it in the same night. Would it be okay to bake the cakes one night, then decorate the next for my birthday the next day? Or would the cake dry out? X
Hiya! Yes that would work well – I often bake the day before, leave in a tin over night, and then decorate the day after! X
Hey Jane! It’s my 12th birthday on Monday and I was hoping to make this cake but I wanted to do two tiers: one 20cm one 26cm. Do you still recommend using the measurements you put at the top or should I change them? Anyways thanks so much for this recipe. I love baking but I’m not so good at it 😂 Love your blog so much xxx ~Shaira
Hiya! I’m not 100% sure what you mean.. but the cake recipe as is is for an 8″/20cm cake, and for a 10″/26cm cake I would use 1.6x the recipe. Each tier will have three layers then, so it will be huge!
Hi would this work with a milk chocolate drip? If so how much oil would you recommend I use? I use the cake recipe lots, thank you!
I would start with one teaspoon, but keep an eye on it. Some Milk chocolate is too thin already so doesn’t need any at all, so try to keep it to a minimum as you mix! x
Thank you!
Hi, what size/type of piping nozzle did you use for the rosettes on top of the cake please?
I believe this was a Wilton 1M nozzle!
I had actually already ordered the Wilton 1M nozzle before you replied after having looked into the best ones for swirls!
Made this for my boyfriend’s birthday and it was perfect!!
This is an awesome cake 💗made for my Oreo loving sons 12th birthday and it was just perfect. Thanks for providing not only a fool proof recipe but all your tips and tricks. The kids are still talking g about it weeks later.
Hi Jane!
Every recipe I’ve used has been amazing! So I’m excited to put the skills to the test with this cake
For my boyfriends 30th!! – can I bake the sponges, cover in cling film and keep in the fridge overnight?
Ahhh yayyy! And I would bake, cover with clingfilm, but store at room temp overnight! x